


Steering
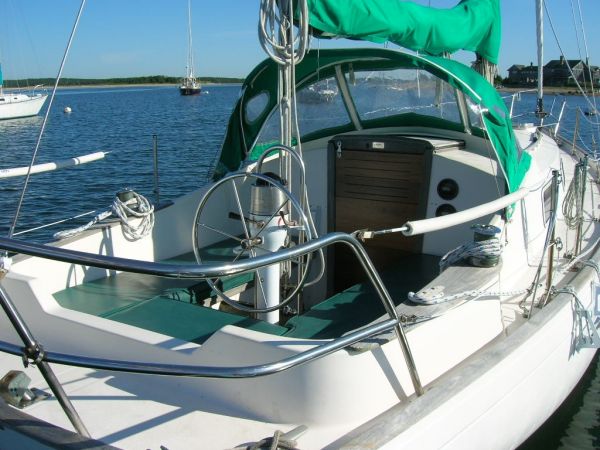
December 2008. Wheel steering
I removed the added Edson pedestal wheel type of steering and went back to a tiller. The tiller stainless fitting needs to be straightened though or replaced. I am also planning on using an Raymarine SPX-5 Plus autopilot.
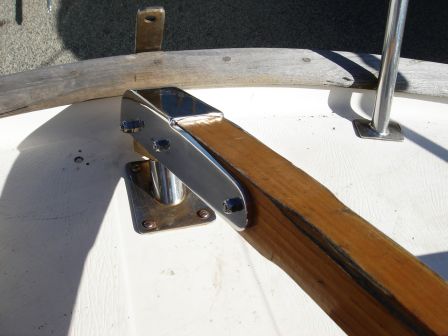
March 2009. Tiller steering
I asked Niemiec Marine to make a new tiller fitting from heavier than original stainless steel. They also found that the key on the rudder post for the tiller-end fitting was not mid-ship meaning the tiller was off to port by about 10° when the rudder is mid-ship. Fixing it would have been expensive. Oh, well, I just need to get used to it. At least, my tiller is now not going to be bent again.
I had to say that Chris made the beautiful tiller fitting. Thanks, Chris!
April 2009. Autopilot
The autopilot is supposed to be attached to the tiller 18" off the center of the rudder post. If not the crooked tiller, the
autopilot would rest right on the end of the coaming. It should be mounted 24.5" from the tiller. Now I have to make 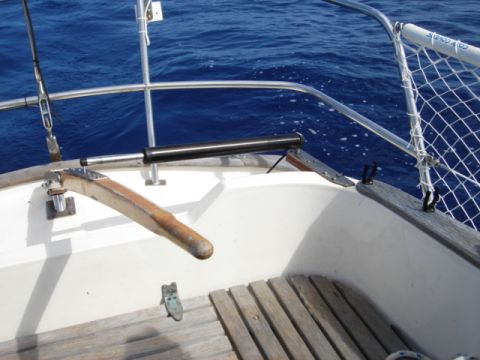 an extension to coaming in a form of a stainless plate.
April 2011. Piscadera Bay, Curacao
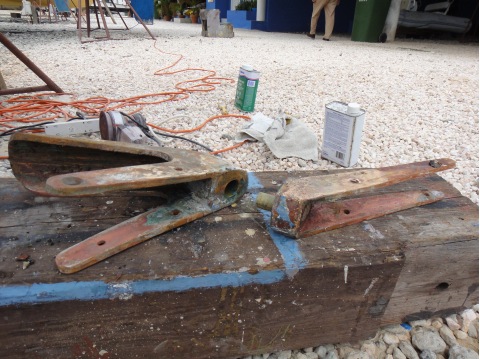
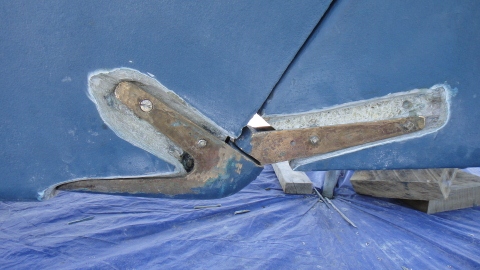
Rudder Bottom Shoe Hinge Repair
Recently I noticed that when I turn the tiller, the rudder make some noise. I put on my mask, snorkel and fins and found that the bottom hinge had worn out. Later I researched that this was a known common problem for most Monsuns of that age. One guy even lost his rudder because he neglected the problem.
The repair is rather simple. I didn't even need to take off the rudder, just the bottom shoe hinges. The mechanic drilled out a bigger hole in the shoe and put in a bronze bushing. After that I installed the hinges back using bolts and nuts instead of the original stainless rivets.
At the same time, I completely removed all the polyester putty around all the hinges because it does not stick to bronze, water gets in and the putty simply falls off. This was the poor job of Niemiec Marine. It only last for one month. I knew that the West System epoxy was not going to adhere to bronze either but I removed the gelcoat around the hinges too in a hope that the epoxy would bind very well to the bare fiberglass and therefore, is not going to fall off.

I used various additives for the epoxy that I had from high density filler to colloidal silica. I also used fiberglass tape and loose fiberglass mat to reduce the amount of epoxy and to make it also stronger.
I spent about half a day filling all the gaps around hinges and another half grinding, sanding and filling again. Next day the rudder was painted as part of the new antifouling job. See Painting.
May, November 2012. Cape Canaveral, USA
Rudder Bottom Shoe Hinge Repair continues...
The problem with the rudder did not end. The new bronze insert does not wear much but
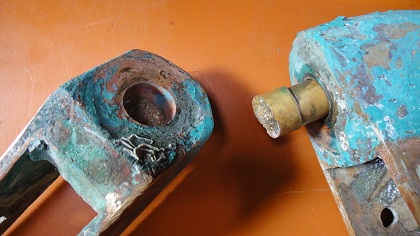 the pin broke. I was lucky that it broke inside the insert.
Cape Marina suggested replacing bronze pins with stainless steel ones arguing that galvanic corrosion will not be a big issue because both metals have similar electrochemical voltages; for example, a bronze propeller on a steel shaft works for years.
They also suggested a Swedish mechanic Kurt whose shop was 10-15 minutes by bike, not far from Mac Donalds. Kurt made new pins in about a week and I paid him around $100.
After I had "fixed" the rudder bearing in May, in November after the summer break I realized that it was not done properly. I could hardly turn the tiller. The reason for that was inaccurate shoe drilling on Curacao. The man there had drilled it at the wrong angle. Now when Kurt here was making the pin for it, he made it even worth by increasing that angle. The cooperation of two professionals made me repositioned the hinges, i.e. the shoe on the keel and its counterpart on the rudder, to align it with three other rudder bearings (at the deck, at the hull bottom and in the middle of the rudder).
October 2015. Curacao

Windpilot Pacific
In summer 2015 I finally installed the  windpilot! I ordered it new from Germany.
It was indeed German quality! It does pay the price! I tested it first on my day trips to Bonaire and back to Curacao, in other words, up the wind and down the wind. It worked like a charm in both directions! It is a magic! It steers the boat much better
than Raymarine autopilot and uses no electrical power! Just wind and water. What else can I say: thank you, Peter Foerthmann for an excellent device that you invented! I should have
invested in it from the beginning!
windpilot! I ordered it new from Germany.
It was indeed German quality! It does pay the price! I tested it first on my day trips to Bonaire and back to Curacao, in other words, up the wind and down the wind. It worked like a charm in both directions! It is a magic! It steers the boat much better
than Raymarine autopilot and uses no electrical power! Just wind and water. What else can I say: thank you, Peter Foerthmann for an excellent device that you invented! I should have
invested in it from the beginning!
Installation was particularly easy for HR Monsun 31. All it takes is to drill
four holes in the transom and bolt it through. I only had to move forward 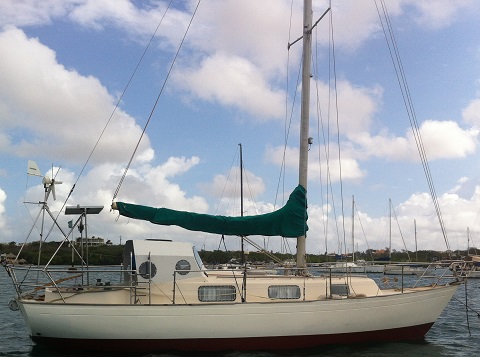 the solar
panel and relocate the storage plate for my outboard from the stern railing to the side;
in other words, to free some space for the windvane.
the solar
panel and relocate the storage plate for my outboard from the stern railing to the side;
in other words, to free some space for the windvane.
May 2023. Gulf Harbour, New Zealand
Because of imperfect alignment of the bottom hinge of the rudder, it keeps wearing out and getting lose. I had to redo it again. Silverdale machine shop made a new pin from 316 steel and drilled a new hole in the bronze shoe. I could only hint them of one dimension by drawing a vertical line that was supposed to align with the rudder shaft. They also made a new insert from high density plastic instead of bronze. It should be easier to replace it next time instead of making the new pin. I had to drill a new hole for the hinge in a rudder again to make it turn. The new pin was very tight inside the new insert, there was no play at all. Despite all the efforts, the misalignment remains. The rudder was not turning freely in all directions. It could be turned on way better than the other. Oh, well, I'd have to live with it.